
This is the first article in a series that will deal with the concept of helping to manage your WordPress installation with Git. In this article, we’ll talk about using Git to manage all of your public plugins that reside in the WordPress Plugin Repository. If you do not yet have any plugins in the Plugin Repository, you can ignore this article for now.
The Standard Way
As you probably already know, the main WordPress Plugin Repository requires you to use SVN (Subversion) to track any code changes you make to your plugin. If you are already using Subversion to keep track of your other code changes, this isn’t a big deal. However, if you’re trying to manage your plugins and other code with Git, this can sometimes be a major pain.
Bringing An SVN Repo Into Git
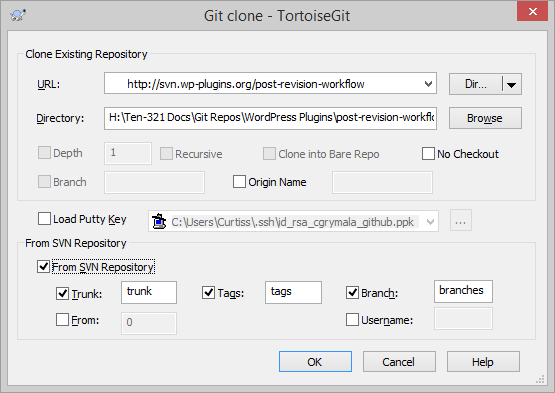
To begin with, you’ll need to use Git to clone your SVN repository. In my case, I use TortoiseGit to handle this part of the equation. I simply right-click (on a Windows machine) and choose “Git Clone”, which opens a new dialog asking for the details of the repo I want to clone. I enter the WordPress Plugin Repo URL in the URL field, the path to the folder where I want my local repo located in the Directory field, then I check the “From SVN Repository” checkbox to indicate that I’m cloning an SVN source repository rather than a standard Git repository.
As far as I can tell, the command-line command to do this would be similar to the following, but if someone has corrections to the command, please let me know.
`git svn clone “http://svn.wp-plugins.org/your-plugin-slug” “\Your\Local\Path\your-plugin-slug” -T trunk -b branches -t tags`
Be forewarned, this process can take a long time (typically at least a few hours in my experience) when cloning a repo from the Plugin Repository. As far as I can tell, the process takes so long because the entire Plugin Repository is treated as essentially a single large repository. The SVN clone command aggressively examines all revisions in the repository, so it has to search through the millions of revisions (1,200,066 total revisions as of Wednesday afternoon) that have occurred across the entire Plugin Repository in order to find the revisions from your plugin.
When you clone an SVN repository this way, Git keeps track of the SVN repository as the authoritative remote source, and pulls in all of the history from that SVN repository.
Keeping Your Repos Synced
If you’re used to using SVN, or some of your team still actively uses SVN, you’ll probably want to transition slowly into using Git. To do so, you’ll need to make sure that your SVN repo and your Git repo remain in sync with each other.
To accomplish this, I’ve used SourceTree in the past, as it does a good job of reminding you what you should & should not do when trying to keep Git & SVN repos in sync with each other (such as the way Tags are created and managed).
Essentially, if you’re planning to keep your SVN repo and your Git repo synced with each other, there’s not much more to do. You simply need to remember the following caveats:
- Whenever you make changes to your code, you’ll need to Push them twice; once to the SVN repo and then again to the remote Git repo (assuming there is a remote Git repo).
- If you have a local SVN copy of your SVN repo (on any computer, including the one where you’re normally editing your code for the Git repo), you’ll need to make sure you run SVN Update on your local copy of the SVN repo before trying to do anything with it.
- The link between the SVN repo and the Git repo is local to your machine; if you use multiple machines to edit your code, you’ll need to repeat this process on those other machines.
Detaching Your Repos
If, instead of continuing to use both repos as somewhat authoritative sources, you want to go whole-hog into Git, you’ll need to make some changes to the local configuration for your Git repository.
The first thing you need to do is go into the .git folder within your local Git repository. You’ll want to open the `config` file in a text editor, and delete the code that looks something like the following.
[svn-remote "svn"]
	url = http://svn.wp-plugins.org/your-plugin-slug
	fetch = trunk:refs/remotes/trunk
	branches = branches/*:refs/remotes/*
	tags = tags/*:refs/remotes/tags/*
You also need to make sure that you delete the `svn` directory within the `.git` folder.
Pushing New Versions to the Plugin Repository
If you’re keeping your two repos in sync with each other, you don’t need to worry about this section. However, if you’ve gone ahead and detached them from each other, you’ll need to find a new way to push your code changes to the WordPress Plugin Repository.
There is an extremely handy, web-based utility that’s built specifically for this purpose. The one caveat about this is that it requires you to use Github to host your remote Git repository (I also assume you need to use public repositories, as you should anyway for public WordPress plugins, but I haven’t tested that to be certain).
This is where Ship, by Big Bite Creative, comes into the picture. As I said, Ship is web-based utility that automatically pushes any code changes from your Github repository to the WordPress Plugin Repository. Any time you push a Git tag to your Github repository, it’s sent as a release/tag to the Plugin Repo. Any time you push other code changes, they’re also automatically pushed to the Plugin Repo. Any mapping that needs to happen between the Git format of your Github repository and the SVN format of the main Plugin Repository is performed within the Ship application without any input from you.
I’ve been testing Ship for about a week, now, and it seems to work pretty well. That said, it seems like there is sometimes a major delay between pushing to Github and subsequently pushing to WordPress. Every once in a while, it seems to fail altogether. Thankfully, if it does fail (and you remember to check on its status), you can also use Ship to manually push a release.
In order to use Ship, you’ll first need to provide some Github API information from your account. This allows Ship to get a list of your repositories (if you belong to a team, it does not have access to your team repositories unless a team owner explicitly grant it permission to do so).
Once Ship shows you the list of your repositories, you can click on the name of a repository to set up the sync process between Ship and the Plugin Repository.
In order to do so, you’ll need to click the “Hook to GitHub” link first, which instructs Ship to set up a Webhook in your GitHub repository’s settings.
Then, you’ll need to provide your WordPress.org username and password, along with the URL to the SVN repository. Ship attempts to auto-fill the SVN URL, but, in the case of all of my plugins, it’s been wrong (I don’t know if WordPress.org changed the URL structure for its repos recently, or if Ship just has the wrong structure altogether), so I’ve had to get the correct URL and paste it in.
Finally, you’ll need to click “Save Details”. Once you’ve done that, the two versions of your repository are hooked together, and any pushes to GitHub should trigger an automatic push to the Plugin Repository.
Conclusion
While this gets you on the path to managing a small part of your site with Git, we still have a long way to go. In the next exciting issue, we’ll look into ways to keep all of your WordPress plugins and themes up to date with Git.
We use https://github.com/nirvdrum/svn2git to maintain git copies of repositories on wordpress.org. The initial clone indeed takes 3-4 hours, but you can then do subsequent fetches which are must faster.